Oracle 11g Real Application Cluster Setup Steps
Prepare the cluster nodes for Oracle RAC:
User Accounts:
NOTE: Oracle
recommend different users for the installation of the Grid Infrastructure (GI)
and the Oracle RDBMS home. The GI will be installed in a separate Oracle base,
owned by user 'grid.' After the grid install the GI home will be owned by root,
and inaccessible to unauthorized users.
1. Create OS groups using the command below.
Enter these commands as the 'root' user:
#/usr/sbin/groupadd
-g 501 oinstall
#/usr/sbin/groupadd
-g 502 dba
#/usr/sbin/groupadd
-g 503 oper
#/usr/sbin/groupadd
-g 504 asmadmin
#/usr/sbin/groupadd
-g 506 asmdba
#/usr/sbin/groupadd
-g 507 asmoper
2.
Create the users that will own the Oracle
software using the commands:
#/usr/sbin/useradd -u 501 -c "Oracle Grid Infrastructure
Owner" -g oinstall -G
asmadmin,asmdba,asmoper grid
#/usr/sbin/useradd -u 502 -c "Oracle RDBMS Owner" -g oinstall
-G dba,oper,asmdba oracle
3. Set
the password for the oracle account using the following command. Replace
password with your own password.
[root@krac1
~]# passwd grid
Changing
password for user grid.
New UNIX
password:
BAD
PASSWORD: it is based on a dictionary word
Retype new
UNIX password:
passwd: all
authentication tokens updated successfully.
[root@krac1
~]#passwd oracle
Changing
password for user oracle.
New UNIX
password:
BAD
PASSWORD: it is based on a dictionary word
Retype new
UNIX password:
passwd: all
authentication tokens updated successfully.
4. Repeat
Step 1 through Step 3 on each node in your cluster.
Networking:
1. Determine your cluster name. The cluster name
should satisfy the following conditions:The cluster name is globally unique
throughout your host domain.
The cluster name is at least 1 character long
and less than 15 characters long.
The cluster name must consist of the same
character set used for host names: single-byte alphanumeric characters (a to z,
A to Z, and 0 to 9) and hyphens (-).
2. Determine the public host name for each node
in the cluster. For the public host name, use the primary host name of each
node. In other words, use the name displayed by the hostname command for
example: kracnode1.
3. Determine the public virtual hostname for
each node in the cluster. The virtual host name is a public node name that is
used to reroute client requests sent to the node if the node is down. Oracle
recommends that you provide a name in the format <public hostname>-vip,
for example: kracnode1-vip. The virtual
hostname must meet the following requirements:
- The virtual IP address and the network name must not be currently in use.
- The virtual IP address must be on the same subnet as your public IP address.
- The virtual host name for each node should be registered with your DNS.
4. Determine
the private hostname for each node in the cluster. This private hostname does
not need to be resolvable through DNS and should be entered in the /etc/hosts file. A common naming
convention for the private hostname is <public hostname>-pvt.
-
The private IP should
NOT be accessable to servers not participating in the local cluster.
- The private network should be on standalone
dedicated switch(es).
- The private network should NOT be part of a larger overall network topology.
- The private network should be deployed on Gigabit Ethernet or better.
- It is recommended that redundant NICs are configured with the Linux bonding driver. Active/passive is the preferred bonding method due to its simplistic configuration.
[root@kracnode2 ~]# nslookup kracnode1-vip
Server:
192.168.1.100
Address:
192.168.1.100#53
Name:
kracnode1-vip.india.com
Address: 192.168.1.60
[root@kracnode2 ~]# nslookup kracnode2-vip
Server:
192.168.1.100
Address:
192.168.1.100#53
Name:
kracnode2-vip.india.com
Address: 192.168.1.61
5. Define a SCAN DNS name for the cluster that resolves to three IP addresses
(round-robin). SCAN IPs must NOT be in the /etc/hosts
file, the SCAN name must be resolved by DNS. For DNS configuration setup refer blog Step by Step DNS configuration
[root@kracnode2
~]# nslookup kracnode-scan
Server:
192.168.1.100
Address:
192.168.1.100#53
Name:
kracnode-scan.india.com
Address:
192.168.1.72
Name:
kracnode-scan.india.com
Address:
192.168.1.70
Name:
kracnode-scan.india.com
Address:
192.168.1.71
6. Even if you are using a DNS,
Oracle recommends that you add lines to the /etc/hosts file on each node,
specifying the public IP, VIP and private addresses. Configure the /etc/hosts file so that it is similar
to the following example:
NOTE: The SCAN IPs MUST NOT be in the /etc/hosts file. This will result in
only 1 SCAN IP for the entire cluster. Refer more about Single Client Access Name(SCAN)
################################################################
#######
--------------- Local Host ----------------- ###########
################################################################
127.0.0.1 localhost.localdomain localhost
################################################################
#######
--------------- eth0 - PUBLIC ------------ ###########
################################################################
192.168.1.50 kracnode1.india.com kracnode1
192.168.1.51 kracnode2.india.com kracnode2
################################################################
#######
--------------------- VIP ------------------ ###########
################################################################
10.10.10.10 kracnode1-priv.india.com kracnode1-priv
10.10.10.20 kracnode2-priv.india.com kracnode2-priv
################################################################
#######
---------------- eth1 - PRIVATE ----------- ###########
################################################################
192.168.1.60 kracnode1-vip.india.com kracnode1-vip
192.168.1.61 kracnode2-vip.india.com kracnode2-vip
7.
If you configured the IP addresses in a DNS
server, then, as the root user, change the hosts search order in /etc/nsswitch.conf
on all nodes as shown here:
Old:
hosts: files nis dns
New:
hosts: dns files nis
After modifying the
nsswitch.conf file, restart the nscd daemon on each node using the following
command:
# /sbin/service nscd restart
Synchronizing
the Time on ALL Nodes:
[root@krac1 ~]# ls -lr /etc/ntp.conf
-rw-r--r-- 1 root root 1833 Dec 9 2009
/etc/ntp.conf
[root@krac1 ~]# service ntpd stop
Shutting down ntpd: [ OK ]
[root@krac1 ~]# mv /etc/ntp.conf
/etc/ntp.conf.bkp
Configuring Kernel Parameter:
1.
As the root user add the following kernel
parameter settings to /etc/sysctl.conf. If any of the arameters are already in
the /etc/sysctl.conf file, the higher of the 2 values should be used.
kernel.shmmni = 4096
kernel.sem = 250 32000 100 128
fs.file-max = 6553600
net.ipv4.ip_local_port_range = 9000 65500
net.core.rmem_default = 262144
net.core.rmem_max = 4194304
net.core.wmem_default = 262144
net.core.wmem_max = 1048576
NOTE: The
latest information on kernel parameter settings for Linux can be found in My
Oracle Support ExtNote:169706.1.
2.
Run the following as the root user to allow
the new kernel parameters to be put in place:
#/sbin/sysctl -p
3. Repeat
steps 1 and 2 on all cluster nodes.
NOTE: OUI
checks the current settings for various kernel parameters to ensure they meet
the minimum requirements for deploying Oracle RAC.
4. Set shell limits for the oracle and grid user:
To improve the
performance of the software on Linux systems, you must increase the shell
limits for the
oracle user
Add the following lines to the
/etc/security/limits.conf file:
grid soft nproc 2047
grid hard nproc 16384
grid soft nofile 1024
grid hard nofile 65536
oracle soft nproc 2047
oracle hard nproc 16384
oracle soft nofile 1024
oracle hard nofile 65536
5.
Add or edit the
following line in the /etc/pam.d/login file, if it does not already exist:
session required pam_limits.so
6.
Make the following changes to the default
shell startup file, add the following lines to the /etc/profile file:
if [[ $USER = "oracle" ] || [ $USER = "grid" ]]; then
if [ $SHELL = "/bin/ksh" ]; then
ulimit -p 16384
ulimit -n 65536
else
ulimit -u 16384 -n 65536
fi
umask 022
fi
For the C
shell (csh or tcsh), add the following lines to the /etc/csh.login file:
if ( $USER = "oracle" || $USER = "grid" ) then
limit maxproc 16384
limit descriptors 65536
endif
7. Repeat
this procedure on all other nodes in the cluster.
Creating the directories.
1.
Create the Oracle Inventory Director:
To create
the Oracle Inventory directory, enter the following commands as the root user:
# mkdir -p /u01/app/oraInventory
# chown -R grid:oinstall /u01/app/oraInventory
# chmod -R 775 /u01/app/oraInventory
2.
Creating the Oracle Grid Infrastructure
Home Directory:
# mkdir -p /u01/11.2.0/grid
# chown -R grid:oinstall /u01/11.2.0/grid
# chmod -R 775 /u01/11.2.0/grid
3. Creating
the Oracle Base Directory
To create
the Oracle Base directory, enter the following commands as the root user:
# mkdir -p /u01/app/oracle
# mkdir /u01/app/oracle/cfgtoollogs #needed to ensure that dbca is able
to run after the rdbms installation.
# chown -R oracle:oinstall /u01/app/oracle
# chmod -R 775 /u01/app/oracle
4.
Creating the Oracle RDBMS Home Directory
To create
the Oracle RDBMS Home directory, enter the following commands as the root user:
# mkdir -p /u01/app/oracle/product/11.2.0/db_1
# chown -R oracle:oinstall /u01/app/oracle/product/11.2.0/db_1
# chmod -R 775 /u01/app/oracle/product/11.2.0/db_1
Check OS Software Requirements
The OUI will check for
missing packages during the install and you will have the opportunity to
install them at that point during the prechecks. Nevertheless you might want to
validate that all required packages have been installed prior to launching the
OUI.
NOTE: These
Requirements are for 64-bit versions of Oracle Enterprise Linux 5 and RedHat?
Enterprise Linux 5. Requirements for other supported
platforms can be found in My Oracle Support ExtNote:169706.1.
binutils-2.15.92.0.2
compat-libstdc++-33-3.2.3
compat-libstdc++-33-3.2.3 (32 bit)
elfutils-libelf-0.97
elfutils-libelf-devel-0.97
expat-1.95.7
gcc-3.4.6
gcc-c++-3.4.6
glibc-2.3.4-2.41
glibc-2.3.4-2.41 (32 bit)
glibc-common-2.3.4
glibc-devel-2.3.4
glibc-headers-2.3.4
libaio-0.3.105
libaio-0.3.105 (32 bit)
libaio-devel-0.3.105
libaio-devel-0.3.105 (32 bit)
libgcc-3.4.6
libgcc-3.4.6 (32-bit)
libstdc++-3.4.6
libstdc++-3.4.6 (32 bit)
libstdc++-devel 3.4.6
make-3.80
pdksh-5.2.14
sysstat-5.0.5
unixODBC-2.2.11
unixODBC-2.2.11 (32 bit)
unixODBC-devel-2.2.11
unixODBC-devel-2.2.11 (32 bit)
The following command can be run on the
system to list the currently installed packages:
rpm -q --qf
'%{NAME}-%{VERSION}-%{RELEASE} (%{ARCH})\n' binutils \
compat-libstdc++-33
\
elfutils-libelf
\
elfutils-libelf-devel
\
gcc \
gcc-c++ \
glibc \
glibc-common
\
glibc-devel
\
glibc-headers
\
ksh \
libaio \
libaio-devel
\
libgcc \
libstdc++ \
libstdc++-devel
\
make \
sysstat \
unixODBC \
unixODBC-devel
Prepare
the shared storage for Oracle RAC
This section describes how to
prepare the shared storage for Oracle RAC Each node in a cluster requires
external shared disks for storing the Oracle Clusterware (Oracle Cluster
Registry and voting disk) files, and Oracle Database files. To ensure high
availability of Oracle Clusterware files on Oracle ASM.
- All of the devices in an Automatic Storage Management diskgroup should be the same size and have the same performance characteristics.
- A diskgroup should not contain more than one partition on a single physical disk device. Using logical volumes as a device in an Automatic Storage Management diskgroup is not supported with Oracle RAC.
- The user account with which you perform the installation (typically, 'oracle') must have write permissions to create the files in the path that you specify.
Shared
Storage
For this example
installation we will be using ASM for Clusterware and Database storage on top
of SAN technology. The following Table shows the
storage layout for this implementation:
Block
Device
|
ASMlib
Name
|
Size
|
Comments
|
/dev/sdb
|
OCR_VOTE01
|
1
GB
|
ASM
Diskgroup for OCR and Voting Disks
|
/dev/sdc
|
OCR_VOTE02
|
1
GB
|
ASM
Diskgroup for OCR and Voting Disks
|
/dev/sdd
|
OCR_VOTE03
|
1
GB
|
ASM
Diskgroup for OCR and Voting Disks
|
/dev/sde
|
ASM_DATA01
|
4
GB
|
ASM
Data Diskgroup
|
/dev/sdf
|
ASM_DATA02
|
4
GB
|
ASM
Data Diskgroup
|
/dev/sdg
|
ASM_DATA03
|
4
GB
|
ASM
Flash Recovery Area Diskgroup
|
/dev/sdh
|
ASM_DATA04
|
4
GB
|
ASM
Flash Recovery Area Diskgroup
|
Partition the Shared Disks:
This section describes how to prepare the
shared storage for Oracle RAC.
1. Once the LUNs have been presented from the
SAN to ALL servers in the cluster, partition the LUNs from one node only, run fdisk to create a single whole-disk partition with
exactly 1 MB offset on each LUN to be used as ASM Disk
[root@kracnode1 ~]# fdisk /dev/sdc
Device contains neither a valid DOS partition table, nor Sun, SGI or OSF
disklabel
Building a new DOS disklabel. Changes will remain in memory only,
until you decide to write them. After that, of course, the previous
content won't be recoverable.
Warning: invalid flag 0x0000 of partition table 4 will be corrected by
w(rite)
Command (m for help): u
Changing display/entry units to sectors
Command (m for help): n
Command action
e extended
p primary partition (1-4)
p
Partition number (1-4): 1
First sector (63-2097151, default 63):
Using default value 63
Last sector or +size or +sizeM or +sizeK (63-2097151, default 2097151):
Using default value 2097151
Command (m for help): w
The partition table has been altered!
Calling ioctl() to re-read partition table.
Syncing disks.
[root@kracnode1 ~]#
Load the updated block
device partition tables by running the following on ALL servers participating
in the cluster:
#/sbin/partprobe
Installing and Configuring ASMLib:
The ASMLib is highly recommended
for those systems that will be using ASM for shared storage within the cluster
due to the performance and manageability benefits that it provides. Perform the
following steps to install and configure ASMLib on the cluster nodes:
1. Download
the following packages from the ASMLib OTN page, if you are an Enterprise Linux
customer you can obtain the software through the Unbreakable Linux network.
NOTE: The
ASMLib kernel driver MUST match the kernel revision number, the kernel revision
number of your system can be identified by running the "uname -r"
command. Also, be sure to download the set of RPMs which pertain to your
platform architecture, in our case this is i686.
oracleasm-2.6.18-194.el5-2.0.5-1.el5.i686.rpm
oracleasmlib-2.0.4-1.el5.i386.rpm
oracleasm-support-2.1.7-1.el5.i386.rpm
2.
Install the RPMs by running the following as
the root user.
[root@kracnode1]#
rpm -Uvh oracleasm-2.6.18-194.el5-2.0.5-1.el5.i686.rpm \
>
oracleasm-support-2.1.7-1.el5.i386.rpm \
>
oracleasmlib-2.0.4-1.el5.i386.rpm
warning:
oracleasm-2.6.18-194.el5-2.0.5-1.el5.i686.rpm: Header V3 DSA signature: NOKEY,
key ID 1e5e0159
Preparing... ###########################################
[100%]
1:oracleasm-support ###########################################
[ 33%]
2:oracleasm-2.6.18-194.el########################################### [
67%]
3:oracleasmlib ###########################################
[100%]
[root@kracnode1]#
3. Configure
ASMLib by running the following as the root user:
[root@kracnode1 ~]# /etc/init.d/oracleasm configure
Configuring the Oracle ASM library driver.
This will configure the on-boot properties of the Oracle ASM library
driver. The following questions
will determine whether the driver is
loaded on boot and what permissions it will have. The current values
will be shown in brackets ('[]').
Hitting <ENTER> without typing an
answer will keep that current value.
Ctrl-C will abort.
Default user to own the driver interface []: grid
Default group to own the driver interface []: asmdba
Start Oracle ASM library driver on boot (y/n) [n]: y
Scan for Oracle ASM disks on boot (y/n) [y]: y
Writing Oracle ASM library driver configuration: done
Initializing the Oracle ASMLib driver: [ OK ]
Scanning the system for Oracle ASMLib disks: [ OK ]
[root@kracnode1 ~]#
4. Repeat
steps 2 - 4 on ALL cluster nodes.
Using ASMLib to Mark the
Shared Disks as Candidate Disks:
To create ASM disks using ASMLib:
1.
As the root user, use oracleasm to create ASM
disks using the following syntax:
# /usr/sbin/oracleasm createdisk disk_name
device_partition_name
Example:
[root@kracnode1 ~]# /usr/sbin/oracleasm createdisk OCR_VOTE01 /dev/sdc1
Writing disk header: done
Instantiating disk: done
[root@kracnode1 ~]# /usr/sbin/oracleasm createdisk OCR_VOTE02 /dev/sdd1
Writing disk header: done
Instantiating disk: done
[root@kracnode1 ~]# /usr/sbin/oracleasm createdisk OCR_VOTE03 /dev/sde1
Writing disk header: done
Instantiating disk: done
[root@kracnode1 ~]# /usr/sbin/oracleasm createdisk ASM_DISK01 /dev/sdf1
Writing disk header: done
Instantiating disk: done
[root@kracnode1 ~]# /usr/sbin/oracleasm createdisk ASM_DISK02 /dev/sdg1
Writing disk header: done
Instantiating disk: done
[root@kracnode1 ~]# /usr/sbin/oracleasm createdisk ASM_DISK03 /dev/sdh1
Writing disk header: done
Instantiating disk: done
[root@kracnode1 ~]# /usr/sbin/oracleasm createdisk ASM_DISK04 /dev/sdi1
Writing disk header: done
Instantiating disk: done
[root@kracnode1 ~]#
2. Repeat
step 1 for each disk that will be used by Oracle ASM.
After you have created
all the ASM disks for your cluster, use the listdisks command to verify their
availability:
[root@kracnode1 ~]# /usr/sbin/oracleasm listdisks
ASM_DISK01
ASM_DISK02
ASM_DISK03
ASM_DISK04
OCR_VOTE01
OCR_VOTE02
OCR_VOTE03
3. On all the other nodes in the cluster, use
the scandisks command as the root user to pickup the newly created
ASM disks. You do not need to create the ASM disks on each node, only on one
node in the cluster.
[root@kracnode2 ]# /usr/sbin/oracleasm
scandisks
Reloading disk partitions: done
Cleaning any stale ASM disks...
Scanning system for ASM disks...
[root@kracnode2 ]# /usr/sbin/oracleasm
listdisks
ASM_DISK01
ASM_DISK02
ASM_DISK03
ASM_DISK04
OCR_VOTE01
OCR_VOTE02
OCR_VOTE03
[root@kracnode2 ]#
Oracle Grid Infrastructure Install. (Basic
Grid Infrastructure Install (without GNS and IPMI))
./runInstaller


Action: Select
radio button 'Install and Configure Grid Infrastructure for a Cluster' and
click ' Next> ' 
Action:
Select radio button 'Advanced Installation' and click ' Next> '


Note: Make sure 'Configure GNS' is NOT selected.

Action:Use
the Edit and Add buttons to specify the node names and virtual IP addresses you
configured previously in your /etc/hosts file. Use the 'SSH Connectivity'
button to configure/test the passwordless SSH connectivity between your nodes.

ACTION: Type in the OS password
for the user 'grid' and press 'Setup'

Action:Click on 'Interface Type' next to the Interfaces you want to use for
your cluster and select the correct values for 'Public', 'Private' and 'Do Not
Use' . When finished click ' Next> '

Action:Select radio button
'Automatic Storage Management (ASM) and click ' Next> '
Action:Select the 'DiskGroup
Name' specify the 'Redundancy' and tick the disks you want to use, when done
click ' Next> '
NOTE: The
number of voting disks that will be created depend on the redundancy level you
specify: EXTERNAL will create 1
voting disk, NORMAL will create 3 voting disks, HIGH will create 5 voting
disks.

Action:Specify and conform the password you want to use and click ' Next> '

Action:Select NOT to use IPMI
and click ' Next> '

Action: Assign the correct OS
groups for OS authentication and click ' Next> '


Action:Specify the locations
for your ORACLE_BASE and for the Software location and click ' Next> '
 Action: Specify the locations
for your Inventory directory and click ' Next> '
Action: Specify the locations
for your Inventory directory and click ' Next> '


 Action: Specify the locations
for your Inventory directory and click ' Next> '
Action: Specify the locations
for your Inventory directory and click ' Next> '
Note: OUI performs certain
checks and comes back with the screen below
Action:Check that status of
all checks is Succeeded and click ' Next> ' 

Action:Click ' Finish'

Action:Follow the instructions
on the screen running the orainstRoot.sh and root.sh scripts as root on all
nodes before you click 'OK'
NOTE: The required root scripts
MUST BE RUN ON ONE NODE AT A TIME!
Sample root.sh output node 1:
#/u01/app/11.2.0/grid/root.sh
Running Oracle 11g root.sh script...
The following environment variables are set as:
ORACLE_OWNER= oracle
ORACLE_HOME= /u01/app/11.2.0/grid
Enter the full pathname of the local bin directory:
[/usr/local/bin]:
Copying
dbhome to /usr/local/bin ...
Copying
oraenv to /usr/local/bin ...
Copying
coraenv to /usr/local/bin ...
Creating /etc/oratab file...
Entries will be added to the /etc/oratab file as
needed by
Database Configuration Assistant when a database is
created
Finished running generic part of root.sh script.
Now product-specific root actions will be performed.
2009-09-25 20:58:00: Parsing the host name
2009-09-25 20:58:00: Checking for super user
privileges
2009-09-25 20:58:00: User has super user privileges
Using configuration parameter file:
/u01/app/11.2.0/grid/crs/install/crsconfig_params
Creating trace directory
LOCAL ADD MODE
Creating OCR keys for user 'root', privgrp 'root'..
Operation successful.
root wallet
root wallet
cert
root cert
export
peer wallet
profile
reader wallet
pa wallet
peer wallet
keys
pa wallet
keys
peer cert
request
pa cert
request
peer cert
pa cert
peer root
cert TP
profile
reader root cert TP
pa root cert
TP
peer pa cert
TP
pa peer cert
TP
profile
reader pa cert TP
profile
reader peer cert TP
peer user
cert
pa user cert
Adding daemon to inittab
CRS-4123: Oracle High Availability Services has been
started.
ohasd is starting
CRS-2672: Attempting to start 'ora.gipcd' on
'kracnode1'
CRS-2672: Attempting to start 'ora.mdnsd' on
'kracnode1'
CRS-2676: Start of 'ora.gipcd' on 'kracnode1'
succeeded
CRS-2676: Start of 'ora.mdnsd' on 'kracnode1'
succeeded
CRS-2672: Attempting to start 'ora.gpnpd' on
'kracnode1'
CRS-2676: Start of 'ora.gpnpd' on 'kracnode1'
succeeded
CRS-2672: Attempting to start 'ora.cssdmonitor' on
'kracnode1'
CRS-2676: Start of 'ora.cssdmonitor' on 'kracnode1'
succeeded
CRS-2672: Attempting to start 'ora.cssd' on
'kracnode1'
CRS-2672: Attempting to start 'ora.diskmon' on
'kracnode1'
CRS-2676: Start of 'ora.diskmon' on 'kracnode1'
succeeded
CRS-2676: Start of 'ora.cssd' on 'kracnode1'
succeeded
CRS-2672: Attempting to start 'ora.ctssd' on
'kracnode1'
CRS-2676: Start of 'ora.ctssd' on 'kracnode1'
succeeded
ASM created and started successfully.
DiskGroup OCR_VOTE created successfully.
clscfg: -install mode specified
Successfully accumulated necessary OCR keys.
Creating OCR keys for user 'root', privgrp 'root'..
Operation successful.
CRS-2672: Attempting to start 'ora.crsd' on
'kracnode1'
CRS-2676: Start of 'ora.crsd' on 'kracnode1'
succeeded
CRS-4256: Updating the profile
Successful addition of voting disk 24ce55bef20d4f4ebf16d733a91bc9d3.
Successfully replaced voting disk group with +DATA.
CRS-4256: Updating the profile
CRS-4266: Voting file(s) successfully replaced
## STATE File Universal Id File Name Disk group
-- ----- ----------------- --------- ---------
1.
ONLINE 24ce55bef20d4f4ebf16d733a91bc9d3
(ORCL:OCR_VOTE01) [OCR_VOTE]
2.
ONLINE 24ce55bef20d4f4ebf16d733a91bc9d3
(ORCL:OCR_VOTE02) [OCR_VOTE]
3.
ONLINE 24ce55bef20d4f4ebf16d733a91bc9d3
(ORCL:OCR_VOTE03) [OCR_VOTE]
Located 1 voting disk(s).
CRS-2673: Attempting to stop 'ora.crsd' on
'kracnode1'
CRS-2677: Stop of 'ora.crsd' on 'kracnode1'
succeeded
CRS-2673: Attempting to stop 'ora.asm' on
'kracnode1'
CRS-2677: Stop of 'ora.asm' on 'kracnode1' succeeded
CRS-2673: Attempting to stop 'ora.ctssd' on
'kracnode1'
CRS-2677: Stop of 'ora.ctssd' on 'kracnode1'
succeeded
CRS-2673: Attempting to stop 'ora.cssdmonitor' on
'kracnode1'
CRS-2677: Stop of 'ora.cssdmonitor' on 'kracnode1'
succeeded
CRS-2673: Attempting to stop 'ora.cssd' on
'kracnode1'
CRS-2677: Stop of 'ora.cssd' on 'kracnode1'
succeeded
CRS-2673: Attempting to stop 'ora.gpnpd' on
'kracnode1'
CRS-2677: Stop of 'ora.gpnpd' on 'kracnode1'
succeeded
CRS-2673: Attempting to stop 'ora.gipcd' on
'kracnode1'
CRS-2677: Stop of 'ora.gipcd' on 'kracnode1'
succeeded
CRS-2673: Attempting to stop 'ora.mdnsd' on
'kracnode1'
CRS-2677: Stop of 'ora.mdnsd' on 'kracnode1'
succeeded
CRS-2672: Attempting to start 'ora.mdnsd' on
'kracnode1'
CRS-2676: Start of 'ora.mdnsd' on 'kracnode1'
succeeded
CRS-2672: Attempting to start 'ora.gipcd' on
'kracnode1'
CRS-2676: Start of 'ora.gipcd' on 'kracnode1'
succeeded
CRS-2672: Attempting to start 'ora.gpnpd' on
'kracnode1'
CRS-2676: Start of 'ora.gpnpd' on 'kracnode1'
succeeded
CRS-2672: Attempting to start 'ora.cssdmonitor' on
'kracnode1'
CRS-2676: Start of 'ora.cssdmonitor' on 'kracnode1'
succeeded
CRS-2672: Attempting to start 'ora.cssd' on
'kracnode1'
CRS-2672: Attempting to start 'ora.diskmon' on
'kracnode1'<blockquote><pre>
CRS-2676: Start of 'ora.diskmon' on 'kracnode1'
succeeded
CRS-2676: Start of 'ora.cssd' on 'kracnode1'
succeeded
CRS-2672: Attempting to start 'ora.ctssd' on
'kracnode1'
CRS-2676: Start of 'ora.ctssd' on 'kracnode1'
succeeded
CRS-2672: Attempting to start 'ora.asm' on
'kracnode1'
CRS-2676: Start of 'ora.asm' on 'kracnode1'
succeeded
CRS-2672: Attempting to start 'ora.crsd' on
'kracnode1'
CRS-2676: Start of 'ora.crsd' on 'kracnode1'
succeeded
CRS-2672: Attempting to start 'ora.evmd' on
'kracnode1'
CRS-2676: Start of 'ora.evmd' on 'kracnode1'
succeeded
CRS-2672: Attempting to start 'ora.asm' on
'kracnode1'
CRS-2676: Start of 'ora.asm' on 'kracnode1'
succeeded
CRS-2672: Attempting to start 'ora.DATA.dg' on
'kracnode1'
CRS-2676: Start of 'ora.OCR_VOTE.dg' on 'kracnode1'
succeeded
CRS-2672: Attempting to start 'ora.registry.acfs' on
'kracnode1'
CRS-2676: Start of 'ora.registry.acfs' on
'kracnode1' succeeded
kracnode1
2010/09/25 21:07:03
/u01/app/11.2.0/grid/cdata/kracnode1/backup_20090925_210703.olr
Preparing packages for installation...
cvuqdisk-1.0.7-1
Configure Oracle Grid Infrastructure for a Cluster
... succeeded
Updating inventory properties for clusterware
Starting Oracle Universal Installer...
Checking swap space: must be greater than 500
MB. Actual 755 MB Passed
The inventory pointer is located at /etc/oraInst.loc
The inventory is located at /u01/app/oraInventory
'UpdateNodeList' was successful.
#
Sample root.sh output node 2:
#/u01/app/11.2.0/grid/root.sh
Running Oracle 11g root.sh script...
The following environment variables are set as:
ORACLE_OWNER= oracle
ORACLE_HOME= /u01/app/11.2.0/grid
Enter the full pathname of the local bin directory:
[/usr/local/bin]:
Copying
dbhome to /usr/local/bin ...
Copying
oraenv to /usr/local/bin ...
Copying
coraenv to /usr/local/bin ...
Creating /etc/oratab file...
Entries will be added to the /etc/oratab file as
needed by
Database Configuration Assistant when a database is
created
Finished running generic part of root.sh script.
Now product-specific root actions will be performed.
2009-09-25 21:08:32: Parsing the host name
2009-09-25 21:08:32: Checking for super user
privileges
2009-09-25 21:08:32: User has super user privileges
Using configuration parameter file:
/u01/app/11.2.0/grid/crs/install/crsconfig_params
Creating trace directory
LOCAL ADD MODE
Creating OCR keys for user 'root', privgrp 'root'..
Operation successful.
Adding daemon to inittab
CRS-4123: Oracle High Availability Services has been
started.
ohasd is starting
CRS-4402: The CSS daemon was started in exclusive
mode but found an active CSS daemon on node rac1, number 1, and is terminating
CRS-2673: Attempting to stop 'ora.cssdmonitor' on
'kracnode2'
CRS-2677: Stop of 'ora.cssdmonitor' on 'kracnode2'
succeeded
An active cluster was found during exclusive
startup, restarting to join the cluster
CRS-2672: Attempting to start 'ora.mdnsd' on
'kracnode2'
CRS-2676: Start of 'ora.mdnsd' on 'kracnode2'
succeeded
CRS-2672: Attempting to start 'ora.gipcd' on
'kracnode2'
CRS-2676: Start of 'ora.gipcd' on 'kracnode2'
succeeded
CRS-2672: Attempting to start 'ora.gpnpd' on
'kracnode2'
CRS-2676: Start of 'ora.gpnpd' on 'kracnode2'
succeeded
CRS-2672: Attempting to start 'ora.cssdmonitor' on
'kracnode2'
CRS-2676: Start of 'ora.cssdmonitor' on 'kracnode2'
succeeded
CRS-2672: Attempting to start 'ora.cssd' on
'kracnode2'
CRS-2672: Attempting to start 'ora.diskmon' on
'kracnode2'
CRS-2676: Start of 'ora.diskmon' on 'kracnode2'
succeeded
CRS-2676: Start of 'ora.cssd' on 'kracnode2' succeeded
CRS-2672: Attempting to start 'ora.ctssd' on
'kracnode2'
CRS-2676: Start of 'ora.ctssd' on 'kracnode2'
succeeded
CRS-2672: Attempting to start 'ora.drivers.acfs' on
'kracnode2'
CRS-2676: Start of 'ora.drivers.acfs' on 'kracnode2'
succeeded
CRS-2672: Attempting to start 'ora.asm' on
'kracnode2'
CRS-2676: Start of 'ora.asm' on 'kracnode2'
succeeded
CRS-2672: Attempting to start 'ora.crsd' on
'kracnode2'
CRS-2676: Start of 'ora.crsd' on 'kracnode2'
succeeded
CRS-2672: Attempting to start 'ora.evmd' on
'kracnode2'
CRS-2676: Start of 'ora.evmd' on 'kracnode2'
succeeded
kracnode2
2010/09/25 21:13:55
/u01/app/11.2.0/grid/cdata/kracnode2/backup_20090925_211355.olr
Preparing packages for installation...
cvuqdisk-1.0.7-1
Configure Oracle Grid Infrastructure for a Cluster
... succeeded
Updating inventory properties for clusterware
Starting Oracle Universal Installer...
Checking swap space: must be greater than 500
MB. Actual 1036 MB Passed
The inventory pointer is located at /etc/oraInst.loc
The inventory is located at /u01/app/oraInventory
'UpdateNodeList' was successful.

Action: Wait for the OUI to
finish the cluster configuration. 
Action: You should see the
confirmation that installation of the Grid Infrastructure was successful. Click
'Close' to finish the install.
RDBMS Software Install:
change into
the directory where you staged the RDBMS software
./runInstaller


 Action: Make sure radio button
'Enterprise Edition' is ticked, click ' Next> '
Action: Make sure radio button
'Enterprise Edition' is ticked, click ' Next> '
 Action: Specify path to your
Oracle Base and below to the location where you want to store the software (Oracle home). Click ' Next>
'
Action: Specify path to your
Oracle Base and below to the location where you want to store the software (Oracle home). Click ' Next>
'
 Action:Use
the drop down menu to select the names of the Database Administrators and
Database perators group and click ' Next> '
Action:Use
the drop down menu to select the names of the Database Administrators and
Database perators group and click ' Next> '
 Action: Check that the status
of all checks is 'Succeeded' and click ' Next> '
Action: Check that the status
of all checks is 'Succeeded' and click ' Next> '
 Action: Perfrom a last check
that the information on the screen is correct before you click ' Finish '
Action: Perfrom a last check
that the information on the screen is correct before you click ' Finish '


 Action: Click 'Create' to
create a new diskgroup
Action: Click 'Create' to
create a new diskgroup


Action: Provide your e-mail
address, tick the check box and provide your Oracle Support Password if you
want to receive Security
Updates from Oracle Support and click ' Next> '

Action: Select the option
'Install Database software only' and click ' Next> '

Action: Select 'Real
Application Clusters database installation', and select all nodes. Use the 'SSH
Connectivity' button to
configure/test the passwordless SSH connectivity between your nodes '

Action: Type the Oracle user password and click "Setup"

Action: To confirm English as
selected language click ' Next> '
 Action: Make sure radio button
'Enterprise Edition' is ticked, click ' Next> '
Action: Make sure radio button
'Enterprise Edition' is ticked, click ' Next> ' Action: Specify path to your
Oracle Base and below to the location where you want to store the software (Oracle home). Click ' Next>
'
Action: Specify path to your
Oracle Base and below to the location where you want to store the software (Oracle home). Click ' Next>
' Action:Use
the drop down menu to select the names of the Database Administrators and
Database perators group and click ' Next> '
Action:Use
the drop down menu to select the names of the Database Administrators and
Database perators group and click ' Next> ' Action: Check that the status
of all checks is 'Succeeded' and click ' Next> '
Action: Check that the status
of all checks is 'Succeeded' and click ' Next> '
Note: If you are sure the
unsuccessful checks can be ignored tick the box 'Ignore All' before you click '
Next> '
 Action: Perfrom a last check
that the information on the screen is correct before you click ' Finish '
Action: Perfrom a last check
that the information on the screen is correct before you click ' Finish '
Action: Log in to a terminal
window as root user and run the root.sh script on the first node. When finished
do the same for all other
nodes in your cluster as well. When finished click 'OK'
NOTE: root.sh
should be run on one node at a time.

Action: Click ' Close ' to
finish the installation of the RDBMS Software.
Run ASMCA to create diskgroups
As the grid user start the ASM
Configuration Assistant (ASMCA)
#su
- grid
cd
/u01/11.2.0/grid/bin
./asmca
 Action: Click 'Create' to
create a new diskgroup
Action: Click 'Create' to
create a new diskgroup
Action: Type in a name for the diskgroup,
select the redundancy you want to provide and mark the tick box for the disks
you want to assign to the new diskgroup. Click

Repeat the same steps
create the diskgroup for the flash recovery area.

Action: Click 'Exit'
Run
DBCA to create the database
As the
oracle user start the Database Configuration Assistant (DBCA)
#su - oracle
cd
/u01/app/oracle/product/11.2.0/db_1/bin
./dbca


Action: choose option 'Create a
Database' and click 'Next'

Action: Select the database
template that you want to use for your database and click 'Next'
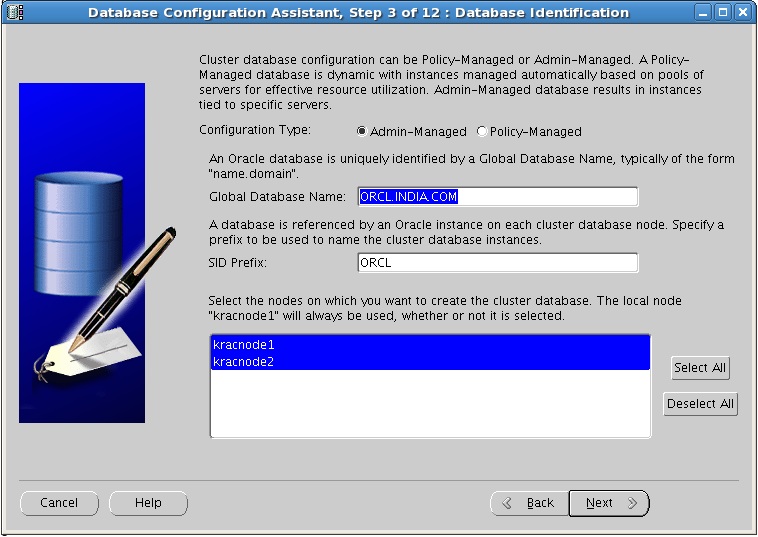
Action: Type in the name you
want to use for your database and select all nodes before you click 'Next'

Action: select the options you
want to use to manage your database and click 'Next'

Action: Type in the passwords
you want to use and click 'Next'

Action: Select the diskgroup
you created for the database files and click 'Multiplex Redo Logs and Control
Files'. In the popup window define the diskgroup that should contain
controlfiles and redo logfiles and the diskgroup that should contain the
mirrored files.

Action : Enter the ASMSNMP Password and click "OK"

Action: Specify the diskgroup
that was created for the flash recovery area and define the size. If the size
is smaller than recommended a
warning will popup.

Action: Select if you want to
have sample schemas created in your database and click 'Next'

Action: Review and change the
settings for memory allocation, characterset etc. according to your needs and
click 'Next'

Action: Review the database
storage settings and click 'Next' 

Action: Review the database
storage settings and click 'Next' 
Action: The database is now
created, you can either change or unlock your passwords or just click Exit to
finish the database creation.

Related Blogs:
--------------------------------------------------------------------------------------------------------------------------
Hope this helps.
Regards,
Kavin.
BE THE BEST !!! BE WITH THE BEST !!!.
Great That's all we need. You have covered almost everything Kavin. Thnx a lot. Please post on Data Guard also.
ReplyDeletegood one ...!!!
ReplyDeleteHi Kavin,
ReplyDeleteVery nice doc. Can I set this at home on Ubuntu ?
Thanks,
Mahua
Hi,
ReplyDeleteCan you please suggest how to configure the asm on RHEL 6 ?
Thanks,
Nikhil.
Thank you for the wonderful Effort..
ReplyDeleteVery useful Document.
- Suseendran
Thank you very much ..I did succesfull installation by using this doc.
ReplyDelete***Good Posting...***
ReplyDeleteThis comment has been removed by the author.
ReplyDeleteHi im eva Oracle consultant. I was just browsing blogs there I found your blog is interesting.. thanks for posting… keep on posting oracleconnections
ReplyDeleteHere by i attached my 2 nodes Lsnrctl Service file
ReplyDeleteplz look this and reverts to me .. waiting your message..
RAC1
[oracle@LinuxRAC1 ~]$ lsnrctl service
LSNRCTL for Linux: Version 11.2.0.1.0 - Production on 30-SEP-2013 11:14:30
Copyright (c) 1991, 2009, Oracle. All rights reserved.
Connecting to (ADDRESS=(PROTOCOL=tcp)(HOST=)(PORT=1521))
Services Summary...
Service "+ASM" has 1 instance(s).
Instance "+ASM1", status READY, has 1 handler(s) for this service...
Handler(s):
"DEDICATED" established:13258 refused:0 state:ready
LOCAL SERVER
Service "DHSW.dhsa.gov.bh" has 1 instance(s).
Instance "DHSW1", status READY, has 1 handler(s) for this service...
Handler(s):
"DEDICATED" established:17261 refused:0 state:ready
LOCAL SERVER
Service "DHSWXDB.dhsa.gov.bh" has 1 instance(s).
Instance "DHSW1", status READY, has 1 handler(s) for this service...
Handler(s):
"D000" established:0 refused:0 current:0 max:1022 state:ready
DISPATCHER
(ADDRESS=(PROTOCOL=tcp)(HOST=LinuxRAC1.dhsa.gov.bh)(PORT=13593))
The command completed successfully
[oracle@LinuxRAC1 ~]$
RAC2
[oracle@LinuxRAC2 ~]$ lsnrctl service
LSNRCTL for Linux: Version 11.2.0.1.0 - Production on 30-SEP-2013 11:49:03
Copyright (c) 1991, 2009, Oracle. All rights reserved.
Connecting to (ADDRESS=(PROTOCOL=tcp)(HOST=)(PORT=1521))
Services Summary...
Service "+ASM" has 1 instance(s).
Instance "+ASM2", status READY, has 1 handler(s) for this service...
Handler(s):
"DEDICATED" established:9192 refused:0 state:ready
LOCAL SERVER
Service "DHSW.dhsa.gov.bh" has 1 instance(s).
Instance "DHSW2", status READY, has 1 handler(s) for this service...
Handler(s):
"DEDICATED" established:3178 refused:0 state:ready
LOCAL SERVER
Service "DHSWXDB.dhsa.gov.bh" has 1 instance(s).
Instance "DHSW2", status READY, has 1 handler(s) for this service...
Handler(s):
"D000" established:0 refused:0 current:0 max:1022 state:ready
DISPATCHER
(ADDRESS=(PROTOCOL=tcp)(HOST=LinuxRAC2.dhsa.gov.bh)(PORT=62997))
The command completed successfully
[oracle@LinuxRAC2 ~]$
great effort.. and thanks a lot wonderful job
ReplyDeletegreat doc ...Thank you very much
ReplyDeleteI was looking for just such an easy to follow guide to undersatnd Oracle RAC especially SCAN concept. I am a System Architect and has to put architectures of different products and Oracle documentation will only give me lots of mind spins. This is absolutely great article. THANK YOU, Kavinprakaash!
ReplyDeletehi error using running root.sh on node1
ReplyDelete[root@rose-rac01 ~]# sh /u01/app/11.2.0/grid/root.sh
Performing root user operation for Oracle 11g
The following environment variables are set as:
ORACLE_OWNER= oracle
ORACLE_HOME= /u01/app/11.2.0/grid
Enter the full pathname of the local bin directory: [/usr/local/bin]:
The contents of "dbhome" have not changed. No need to overwrite.
The contents of "oraenv" have not changed. No need to overwrite.
The contents of "coraenv" have not changed. No need to overwrite.
Entries will be added to the /etc/oratab file as needed by
Database Configuration Assistant when a database is created
Finished running generic part of root script.
Now product-specific root actions will be performed.
Using configuration parameter file: /u01/app/11.2.0/grid/crs/install/crsconfig_params
User ignored Prerequisites during installation
CRS-2672: Attempting to start 'ora.cssdmonitor' on 'rose-rac01'
CRS-2676: Start of 'ora.cssdmonitor' on 'rose-rac01' succeeded
CRS-2672: Attempting to start 'ora.cssd' on 'rose-rac01'
CRS-2672: Attempting to start 'ora.diskmon' on 'rose-rac01'
CRS-2676: Start of 'ora.diskmon' on 'rose-rac01' succeeded
CRS-2676: Start of 'ora.cssd' on 'rose-rac01' succeeded
Disk Group OCR_VOTE creation failed with the following message:
ORA-15018: diskgroup cannot be created
ORA-15041: diskgroup "OCR_VOTE" space exhausted
Configuration of ASM ... failed
see asmca logs at /u01/app/oracle/cfgtoollogs/asmca for details
Did not succssfully configure and start ASM at /u01/app/11.2.0/grid/crs/install/crsconfig_lib.pm line 6763.
/u01/app/11.2.0/grid/perl/bin/perl -I/u01/app/11.2.0/grid/perl/lib -I/u01/app/11.2.0/grid/crs/install /u01/app/11.2.0/grid/crs/install/rootcrs.pl execution failed
Thank you for your time to Help us.
ReplyDeleteKavin,
ReplyDeleteVery nice documentation. thanks a lot.
Nice Doc
ReplyDelete